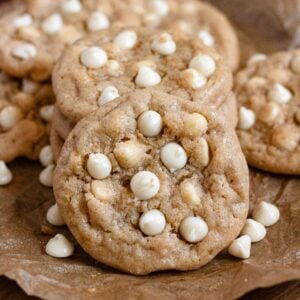
Lucky Charms Cookies
These Lucky Charms Cookies are the perfect way to celebrate a festive and delicious St Patrick’s Day. These chewy cookies are full of yummy white chocolate chips and, the very best part, Lucky Charms marshmallows!

It is truly a shame that this recipe is made with Lucky Charms and is typically viewed as a St Patrick’s Day Recipe because man oh man, am I OBSESSED with it. The cookie base is flat and chewy, and it is filled to the brim with scrumptious white chocolate chips and, the best part, Lucky Charms marshmallows.
As the cookies bake, the Lucky Charms Marshmallows in the cookie melt into the dough, allowing the dough to spread more than usual and become even chewier. They are sweet and unique and seriously so delicious!
And while these cookies are decorated for St Patrick’s Day, I highly recommend making them any time of year. Your taste buds will be excited to try them on whichever day you make them. Serve them alongside these Green St Patrick’s Day Cookies, Key Lime Cookies, or Recipes with Irish Cream for an extra festive dessert table!
Why Make this Recipe?

- Festive Treat: St Patrick’s Day is such a fun holiday to celebrate, and Lucky Charms, with their leprechaun mascot and rainbow marshmallows, is the perfect way to add a festive twist to the holiday! Put some of that delicious cereal into your cookies and you have a perfect dessert for your St Patrick’s Day celebration.
- Chewy Cookies: This St Patrick’s Day cookie recipe is made with the same base recipe as my Easy Chocolate Chip Cookies, but the Lucky Charms Marshmallows give them a special twist. As the marshmallows melt, they make the cookie even thinner and chewier than my other cookie recipes. We are obsessed with the texture of them!
- Under 30 Minutes: I can’t stand when cookie recipes need a chilled dough, which means that almost all of the cookie recipes on my site are no-chill recipes! This Lucky Charms Cookie recipe can be made in under 30 minutes. Mix it up in 10, bake in 15 minutes, and you have dessert ready in no time!
What Do I Need to Make this Recipe?
Ingredients

- Butter: I often use unsalted butter in my recipes because different brands of salted butter contain different amounts of salt, and I want to be able to control the saltiness of my cookies. If you use salted butter, make sure to adjust the amount of additional salt you add to this recipe. Your butter should be at room temperature with an internal temperature between 68-72 degrees Fahrenheit.
- Brown Sugar: I use light brown sugar, but if you want more of a molasses-y flavor profile, use dark brown sugar. Either is delicious!
- Granulated Sugar: Make sure to use the scoop and level method on your granulated sugar so that you are baking with the right amount. This recipe calls for less granulated sugar than a normal cookie recipe, which allows the brown sugar to shine and make it extra chewy!
- Egg: Use a large egg, and try to use a room temperature one!
- Vanilla: This recipe uses 2 tsp of vanilla which makes for an extra sweet base dough recipe. The marshmallows also add a lot of sweetness to this recipe, so if you think that sweetness will be overwhelming, feel free to use only 1 tsp of vanilla. I loved them as-is though!
- All Purpose Flour: Again, make sure to use the scoop and level method so that you are using the right amount of flour!
- Baking Soda: Baking soda interacts with the brown sugar to make a chewy cookie. Do not substitute baking powder, as the cookies will turn out different than the photos.
- Salt: These cookies tend to be pretty sweet, so if you want to cut down on the sweetness a bit, add some more salt to the recipe!
- White Chocolate Chips: These are delicious, but feel free to substitute semisweet chocolate chips, milk chocolate chips, mini chocolate chips, butterscotch chips, or cinnamon chips for a delicious twist!
- Lucky Charms Marshmallows: The most tedious part of this recipe is picking the dehydrated marshmallows out of the cereal box so that you can add them into the dough. All that extra time is worth it though!
Tools
- Stand Mixer: It is so easy to make this recipe in the bowl of a stand mixer using a paddle attachment. Alternatively, you can use a mixing bowl with an electric hand mixer.
- Wooden Spoon: To stir the white chocolate chips and Lucky Charms Marshmallows into the cookie dough. You want to do this by hand so that you do not damage the mix-ins.
- Parchment Paper: Parchment paper allows for cookies to bake more evenly and also has a non-stick quality which will be helpful when removing these marshmallow-filled cookies from the tray.
- Baking Sheet: The baking sheet you choose can affect the bake time of your cookies. A dark baking sheet will allow the cookies to be ready maybe around 12 minutes while a lighter baking sheet will push the cook time to around the 15 minute mark.
How to Make this Recipe
Step 1: Mix the Wet Ingredients


Preheat your oven to 325 degrees Fahrenheit. Line a baking sheet with parchment paper and set aside.
In a large mixing bowl or in the bowl of a stand mixer, cream together the softened butter, brown sugar, and granulated sugar until light and creamy.
Add the egg and vanilla into the cookie dough and beat again until just combined.
Step 2: Add the Dry Ingredients


Add the flour, baking soda, and salt and beat until just combined. Do not overmix.
Use a wooden spoon or rubber spatula to mix in the white chocolate chips and the Lucky Charms marshmallows until evenly distributed.
Step 3: Scoop and Bake


Scoop the cookie dough onto a parchment-paper lined cookie sheet using a #24 cookie scoop (about 2 ½ Tablespoons of dough each).
Bake in the preheated oven for 12–15 minutes or until the edges turn brown but the centers are still soft.
Allow the cookies to cool on the baking sheet for a few minutes. After 5 minutes, transfer the cookies to a wire rack to cool the rest of the way.
Serve and enjoy!
How to Get Picture Perfect Cookies

Getting picture perfect cookies starts the moment that your baked cookies are removed from the oven.
- Shaping: When the cookies are still hot, use the back of a spoon to push the edges of the warm cookie so that the cookie forms a more perfect circle. You can also put a large, circular cookie cutter around the cookies and swirl so that the cookies form a perfect circle. Sometimes those make my cookies smaller than I want, though, so I recommend the spoon method.
- Toppings: Make sure you have a few extra white chocolate chips and marshmallows reserved for when your cookies come out of the oven. After the cookies are shaped, press a few extra chocolate chips and marshmallows gently onto the top of the cookie. The bottoms of the toppings will melt, securing them to the cookie, but the heat is not warm enough to melt them entirely. This makes for pretty toppings and picture perfect cookies!
Variations

These cookies are pretty perfect as-is, but you can always feel free to adjust them as you desire! Here are some suggestions of different variations to try:
- Chocolate Drizzle: Try drizzling melted chocolate (either milk chocolate or white chocolate) over the top of the baked cookies for an extra chocolatey twist.
- Mix Ins: Try mixing in some of the Lucky Charms cereal for some extra texture in your cookies! To go for a S’mores twist (like these S’more Brownies), try mixing in some graham crackers or even sprinkling them on top.
- Sprinkles: Really send these Lucky Charms cookies over the top and embrace the rainbow of St Patrick’s Day by mixing sprinkles into the base dough of this recipe or topping the cookie with rainbow sprinkles.
- Nutty Crunch: If you like a variety of textures in your cookies, you may like to add some nuts for crunch. Try mixing in chopped nuts like macadamia nuts, walnuts, almonds, or pecans.
Expert Tips
- Make sure to remove the paddle attachment from the stand mixer before adding the marshmallows and white chocolate chips. Stir those in by hand so that they don’t get broken!
- Make sure not to overbeat once you add the egg. The more you beat the dough with the egg, the cakier (and perhaps drier) the cookie will become.
- You will know your cookies are done baking when the edges are brown and set. The center of the cookie should look soft but not shiny. If it is shiny and wet, they may still need to bake for a few more minutes.
What to Serve this Lucky Charm Cookie Recipe With
These cookies are great for a St Patrick’s Day dessert, but what about the main course? Try out some traditional Irish dishes for a yummy St Patrick’s Day feast. Some of my favorites from Ireland are colcannon and Irish Stew. If you are serving Corned Beef and Cabbage, here are some suggestions of What to Serve with Corned Beef and Cabbage. These cookies may also be delicious when served alongside Irish Breakfast Tea.
Recipe FAQs

Yes! This recipe works with 1:1 Gluten Free flour. While some marshmallows are not gluten free, Lucky Charms marshmallows are! So if you can find the right 1:1 flour to substitute the cookie recipe, you can enjoy these Lucky Charms Cookies!
You can store already-baked cookies in an airtight container at room temperature for about 4 days.
To freeze, put the baked cookies in a resealable bag and place them in the freezer for up to 3 months. Make sure to remove them from the oven about 30 minutes before you’d like to eat them to give them time to thaw.
If you accidentally leave your cookies out on the counter for too long and they become stale, you can still fix them! Simply seal the cookies in an airtight container with a slice of bread overnight. In the morning, the bread will be stale and the cookies will be back to their usual soft selves!
Yes, you can freeze Lucky Charm Cookie Dough so that you can make your cookies later! To do so, scoop the cookies out onto a parchment paper-lined baking sheet. Place the cookie sheet in the freezer for about 60 minutes until the cookie dough balls are frozen solid.
When they are frozen, remove the frozen cookie dough from the baking sheet and place them in a resealable freezer bag. When you want to bake, place the frozen cookie dough balls back on a baking sheet at room temperature and allow them to thaw. Then proceed to bake according to the recipe instructions.
Did you enjoy this recipe for Lucky Charms Cookies? If so, make sure to check out these other recipes I picked out just for you:
- Butterscotch Chocolate Chip Cookies
- Brown Butter Cream Cheese Frosting
- Muffin Mix Pancakes
- Brownie Batter Dip

Lucky Charms Cookies
Equipment
- Stand Mixer
- Wooden Spoon
- Parchment Paper
- Baking Sheet
Ingredients
- 1/2 cup 1 stick unsalted butter, softened
- 1/2 cup packed light brown sugar
- 1/4 cup granulated sugar
- 1 large egg
- 2 teaspoons vanilla extract
- 1 ½ cups all-purpose flour
- 1/2 teaspoon baking soda
- 1/4 teaspoon salt
- ¾ cup White Chocolate Chips
- ¾ cup Marshmallows from Lucky Charms Cereal
Instructions
- Preheat your oven to 325 degrees Fahrenheit. Line a baking sheet with parchment paper and set aside.
- In a large mixing bowl or in the bowl of a stand mixer, cream together the softened butter, brown sugar, and granulated sugar until light and creamy.
- Add the egg and vanilla into the cookie dough and beat again until just combined.
- Add the flour, baking soda, and salt and beat until just combined. Do not overmix.
- Use a wooden spoon or rubber spatula to mix in the white chocolate chips and the Lucky Charms marshmallows until evenly distributed.
- Scoop the cookie dough onto a parchment-paper lined cookie sheet using a #24 cookie scoop (about 2 ½ Tablespoons each).
- Bake in the preheated oven for 12–15 minutes or until the edges turn brown but the centers are still soft.
- Allow the cookies to cool on the baking sheet for a few minutes. After 5 minutes, transfer the cookies to a wire rack to cool the rest of the way.
- Serve and enjoy!
Notes
- Butter: I often use unsalted butter in my recipes because different brands of salted butter contain different amounts of salt, and I want to be able to control the saltiness of my cookies. If you use salted butter, make sure to adjust the amount of additional salt you add to this recipe. Your butter should be at room temperature with an internal temperature between 68-72 degrees Fahrenheit.
- Brown Sugar: I use light brown sugar, but if you want more of a molasses-y flavor profile, use dark brown sugar. Either is delicious!
- Granulated Sugar: Make sure to use the scoop and level method on your granulated sugar so that you are baking with the right amount. This recipe calls for less granulated sugar than a normal cookie recipe, which allows the brown sugar to shine and make it extra chewy!
- Egg: Use a large egg, and try to use a room temperature one!
- Vanilla: This recipe uses 2 tsp of vanilla which makes for an extra sweet base dough recipe. The marshmallows also add a lot of sweetness to this recipe, so if you think that sweetness will be overwhelming, feel free to use only 1 tsp of vanilla. I loved them as-is though!
- All Purpose Flour: Again, make sure to use the scoop and level method so that you are using the right amount of flour!
- Baking Soda: Baking soda interacts with the brown sugar to make a chewy cookie. Do not substitute baking powder, as the cookies will turn out different than the photos.
- Salt: These cookies tend to be pretty sweet, so if you want to cut down on the sweetness a bit, add some more salt to the recipe!
- White Chocolate Chips: These are delicious, but feel free to substitute semisweet chocolate chips, milk chocolate chips, mini chocolate chips, butterscotch chips, or cinnamon chips for a delicious twist!
- Lucky Charms Marshmallows: The most tedious part of this recipe is picking the dehydrated marshmallows out of the cereal box so that you can add them into the dough. All that extra time is worth it though!
- Make sure to remove the paddle attachment from the stand mixer before adding the marshmallows and white chocolate chips. Stir those in by hand so that they don’t get broken!
- Make sure not to overbeat once you add the egg. The more you beat the dough with the egg, the cakier (and perhaps drier) the cookie will become.
- You will know your cookies are done baking when the edges are brown and set. The center of the cookie should look soft but not shiny. If it is shiny and wet, they may still need to bake for a few more minutes.


Looks yummy!
Thank you Diane! I hope you make them and love them!!